Metal detecting is a great hobby that can lead to some amazing finds and connect you to the adventures of being outdoors.
But what do you do if you want to get into metal detecting but don’t have the money to buy a detector? Or maybe you’re just curious about how metal detectors work and want to try building one yourself.
In this blog post, we will give you step-by-step instructions on how to make different types of metal detectors using materials that are easy to find and affordable. So whether you’re a beginner or an experienced metal detectorist, there’s something for everyone in this guide!
Can You Make a Metal Detector at Home?
The short answer is yes, you can make a metal detector at home. However, the level of difficulty and effectiveness will vary depending on the type of detector you want to make.
In this section, we will give you an overview of the three most common types of DIY metal detectors and provide instructions on how to make them.

The three types of DIY metal detectors we will be looking at are:
- A Calculator and Radio Metal Detector (the old school method)
- A Smartphone App Metal Detector (the easy and painless method)
- The Big Daddy Metal Detector (the complete construction of an everyday detector)
So let’s get started!
How to Make a Metal Detector with A Calculator and Radio
Making a metal detector with a calculator and radio is a pretty well-known method to make your own metal detector. In fact, it’s been made even more popular by the Curious George episode where George uses this technique to find his lost toy robot at the beach.
After some research, I got some mixed reviews on whether or not this actually works. Understanding that this wouldn’t be a significantly powerful metal detector, if I built one, it should be able to at least recognize metal when it is close without being buried, right?
I didn’t have exactly what I needed to test this out so I picked up the correct supplies and began to build this DIY metal detector.
What Materials Are Needed to Make a Metal Detector with A Calculator and Radio?
To make a metal detector with a calculator and radio, you only need a battery-powered calculator, a battery-powered AM radio, and some masking tape.
I actually had the AM radio and the masking tape, but my calculator was solar-powered. To stick to directions found all over the internet, I picked up a battery-powered calculator.
Next, I went about constructing the calculator and radio metal detector, which wasn’t difficult at all.

Step 1 – AM Radio
First, I turned on the radio (AM only for those dual-band users) and scrolled all the way to the right-hand side of the dial. Then turn the volume on the radio all the way up. The goal is to get that loud static sound and avoid any actual radio station.
Step 2 – Calculator
Step 2 is to turn the calculator on and bring it close to the radio. Ensure that the two devices are back to back so that their internal components are as close as possible without covering up the speaker of the radio or the face of the calculator.
Now, move the calculator and AM radio around until you find the sweet spot. What you’re looking for is a louder, steady buzz coming from the speakers of the radio. If you can’t seem to get it to work, try adjusting the calculator and radio’s position until you hear the noise.
Step 3 – Masking Tape
Once you have found the sweet spot, take a piece of masking tape and secure the two devices together. I’ve also seen some directions suggesting using an old CD case in place of the masking tape, but either would be fine.

At this point, you should be able to move your constructed metal detector near some metal and the output from the radio speaker will let you know by making audibly displaying the frequency it is picking up.
Final Thoughts for Our First Method
As for my own personal test, I didn’t have much luck using it as an effective metal detector. I could hear some slight change in the buzz when the radio neared a particular metal object, but not all of them. Of course, this doesn’t mean that it won’t work for you!
You see the radio itself acts more to amplify frequencies and audibly project what it is receiving, while the calculator is essentially a sensor. This is because the clock chip inside a calculator directs the path of circuits to input and output devices, specifically the display of the calculator.
The display has an LCD screen which makes its power consumption higher while offering no protection from outside interference, thus making it most affected by any nearby metals.
There are some reasons why it may not be working the best. If either of the devices uses a metal casing, this will limit the impact of any outside metals you are trying to detect. Also, if using an all-digital radio, there would not be an oscillator circuit as with an analog tuner, which would pick up metal detection easier.
Overall, this was a fun project and I’m glad I tried it, but it’s not something that I would count on if needing to find metal in an outdoor environment.
Can I Use My Phone as A Metal Detector?
The answer is yes! Metal detector apps are available for both Android and iOS devices, but there are a couple of things you should be aware of before trying this option.

First, some apps are specifically designed to work with either an iOS device or an Android device. So know what options are available to you in the first place.
Second, these apps really only detect ferrous metals. So, if you’re looking for something like gold or silver, an app is not going to be much help. However, coins and other small metal objects that are ferrous metals will be detectable.
Now that we’ve got that out of the way, let’s take a look at how this method of DIY metal detector works.
Step 1 – Download the App
For my personal test, I use an iPhone, so I searched for an app on the Apple store. I was surprised how many apps there were and even better, they were free! I downloaded the first one I saw which had a lot of good reviews (4 out of 5 stars with over 7,000 reviews). It’s simply called “Metal Detector” by Alexandr Balyberdin.
I’d also like to say that the app has no ads annoyingly popping up like so many apps do. Just for that, it’s my new favorite app!
Once you decide on the app of your choice, hit download and get ready for some fun.
Step 2 – Adjust your Settings
When you open the freshly downloaded up, you have what appears to be a rustic (and cool!) control box with a meter and one dial. The dial controls the sensitivity of your metal detector
Step 3 – Using the App

To use this DIY metal detector, simply scan your phone over the metal you want to detect. As stated in the app description (and verified by me), the best way to pick up any metal nearby is to scan over areas with your phone’s camera lens.
When you successfully find a piece of ferrous metal, the meter will bounce to the right side of the screen and your phone will make a low beeping sound. If your phone is on vibrate, it will vibrate a few times to indicate success.
The app certainly works as advertised and I definitely had more success than the radio and calculator method. I don’t think you’ll be using this option to go hunting for relics anytime soon but if you dropped something at a backyard BBQ, it could just be the tool you are looking for.
Final Thought for Our Second Method
The reason this and many other apps work so well is that each smartphone has a magnetometer built into it. Its primary purpose or designed intention is for use in the compass app to help you get your bearings when lost.
So, if you’re metal detecting and all you have is your phone with you, go ahead and give one of these metal detector apps a try!
But just remember, it’s a phone so don’t expect to find the Ark of the Covenant.
How to Make a BFO (Beat Frequency Oscillator) Metal Detector

A BFO or beat frequency oscillator is a metal detector that uses the principle of heterodyning to create two frequencies (from 2 different coils) and then detects the difference in their pitch. This type of metal detector is very simple to make and only requires a few basic parts, making it a great option for beginners.
What Materials Are Needed to Make a BFO Metal Detector?
The main component of this metal detector is the circuit board, which many of the pieces can be found in any old broken, or unused radio.
Or, simply get a new one from Amazon for a couple of bucks. In addition to the amplifier, you will also need a coil of wire, some capacitors, and a metal detector wand.
The wand and pretty much all other components of the detector (besides the electronics) can be simple household items. We will discuss this in more detail when going through the building process.
Keep in mind that there are actually several ways a BFO metal detector can be put together. No way is better than the next. You can choose to build every last piece yourself, including the circuits and search coil.
If this is the case, be sure to pick up a reliable soldering iron, a heat gun, and maybe some spray paint to add a little flair to your design.
Step 1 – The Circuit Board

The first step in making your metal detector is to build the circuit board. This can be done in a couple of different ways, and there is an almost unlimited supply of circuit designs available online. I won’t pretend to be an electronic genius and understand the first thing about circuitry.
My choice would normally be to buy a prebuilt circuit board and just use it in my plans when constructing everything else.
But, if you know a thing or two about electronics design and you want to take a crack at building a circuit board, here are a couple of designs you can get started with.
- Simple BFO Metal Detector Schematic Diagram
- Metal Detector Circuit – Using Beat Frequency Oscillator (BFO)
- BFO Metal Detector
Step 2 – The Reference Coil
A reference coil is the smaller of the two oscillator coils in a metal detector. It is usually wound on a small form, like a spool, and must match the inductance of the detector coil.
To get the exact number of turns for your coil length, it’s best to use an inductor simulation to calculate the specific inductance needed. You can use the simulator found here.

This part of the process takes some patience, especially if you’re winding the coil by hand. But, it’s a very important step in building your metal detector and will affect the overall performance.
To get the exact inductance you’ll need to know what you are using for the coil; a spool, pill bottle, etc. I’d recommend something like a pill bottle or anything that has a hollow center. This will come in handy if needing to adjust your inductance in the final stages of your build.
You’ll also need to select a coil wire so you can determine what thickness it is. Generally, you want a coil wire that is malleable but holds up to the wrapping around your form. I would stay away from anything less than 28-gauge magnet wire.
Once you have the dimensions needed and used the simulation, you can then begin to construct your reference coil.
Step 3 – The Search Coil
The search coil is the larger of the two oscillator coils in a metal detector and is responsible for detecting metal objects. It’s wound on a form that is much bigger than the reference coil and should have more turns of wire.
The size of the coil form will determine how big your search coil will be, so it’s important to get this right. The number of turns will also affect the performance, so it’s best to use a coil winding form and calculator (mentioned above) to get the most accurate measurements.
However, a general consensus seems to be a turn of the wire 11 times.

When building your search coil, try your best to use a form that is lightweight and easy to manage. A lot of people usually go with some type of wood material, which is fine, but it can get heavy.
If you do use wood for your coil form, just be sure to cut out some shapes from the internal parts of the wood to lighten your load. To keep the wood whole is basically unnecessary and will only make things harder on you.
Step 4 – The Handle and Shaft
The metal detector’s handle and shaft can be made out of a number of materials. PVC pipe is a popular choice because it’s lightweight, easy to work with, and can be found at most home improvement stores.
You’ll need to cut the pipe to the desired length and use some additional pieces of PVC pipe and elbow pieces to design a handle and shaft that is comfortable for you to hold.
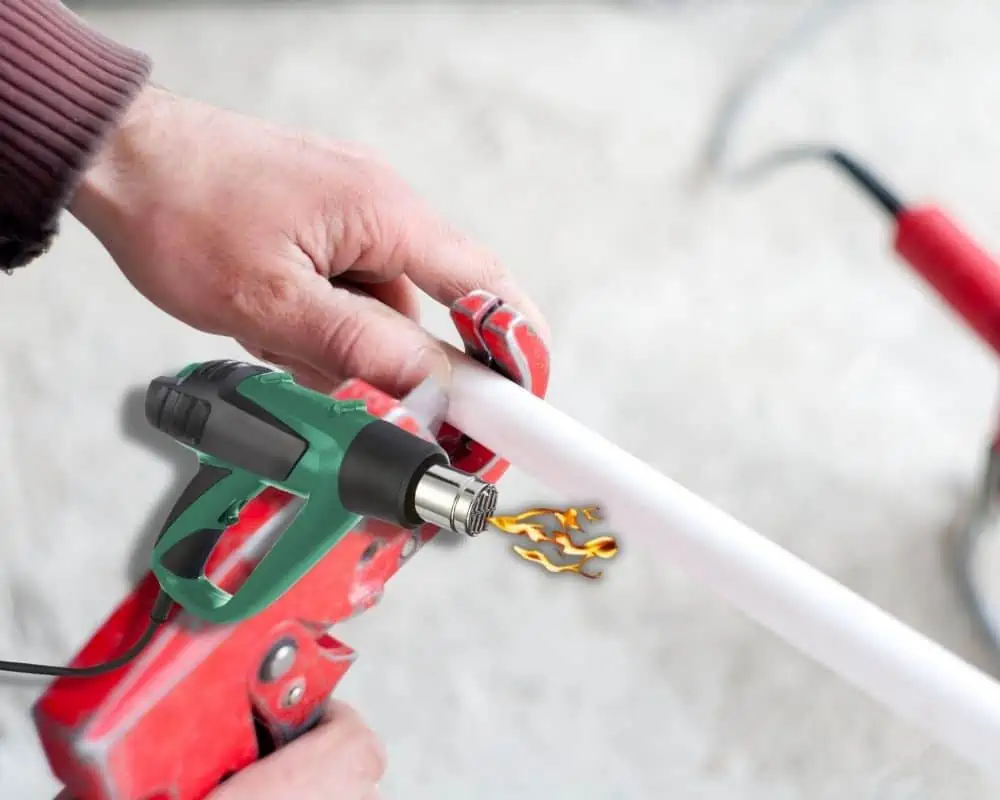
To get the kind of bend you will need from your PVC, a heat gun is the best way to go. Just be sure to take your time and measure everything before you start heating PVC pipe. It will get very hot, so use caution when handling it.
Once it is hot enough, you can bend, flatten, or alter the shape of the pipe to your liking.
When your general shape is completed, you will need to make some kind of container for your circuit board. You can use a storage bin, Tupperware, or even a tissue box. Just make sure it is sturdy enough to mount on the handle and not worry about it coming apart after some use.
Hopefully, it is large enough that you can fit the circuit board as well as the reference coil. If not, you can attach the reference coil to the shaft with some kind of harness.
Now it’s time to connect your search coil to the end of the shaft. This is where some metal detector enthusiasts like to use a threaded rod. It gives the coil some extra support and can prevent it from moving around while in use.
If you do decide to go this route, just be sure to drill a hole through the center of your shaft that is large enough for the threaded rod to fit snugly.
Step 5 – Testing It Out
**Side note** I should mention that if you are building your own circuit board, remember to include a connector for your power source. Your connector for something this size is generally going to be for a 9-volt battery. If you bought your circuit board, you probably don’t have to worry about this.
Now that all your components and wires are connected, it’s time to test it out. You will need a metal object to detect and, of course, your brand new DIY BFO metal detector.

Hook up the power source and start detecting your test objects. If all goes according to plan, your metal detector should start beeping or making some other noise when it’s close to the metal.
If however, you get no response at all, it could mean that you don’t have the same frequency for the two inductors. To adjust this, the best thing you can do is add some metal (small pieces like washers or screws) to the inside of your reference coil.
Adding metal here will create more induction to your coil and get both coils to the same frequency. This is more of a trial and error type of situation so don’t get frustrated if it doesn’t work at first.
Once you’ve got that all sorted out, you should be all ready to show off your new DIY. Take some pride in it because I know it wasn’t easy!
Final Thought for Our Third Method
This third method is a little more difficult than the first two, but it’s still doable for most people. If you’re feeling adventurous and have some experience with circuit boards, then this might be the project for you.
But like I said, it is a little more difficult and will require some additional tools like a soldering iron and a heat gun.
Conclusion
So there you have it, three different ways to make your very own metal detector. Each one has its own set of pros and cons, so it really depends on what you’re looking for and how much time and effort you want to put into it.
I hope this article was helpful and that you are now ready to start building your very own metal detector.